How to Use Pi-hole and the Mullvad VPN on a Raspberry Pi
Introduction
Are you afraid that your ISP (Internet Service Provider) might be spying on you and reading all of your home network traffic? Are you tired of seeing ads everywhere? Or maybe you simply don't like the idea of a random company seeing and tracking every single mouse movement and keyboard stroke while you surf the web?
Well, if those are some of your concerns, you're definitely in the right place!
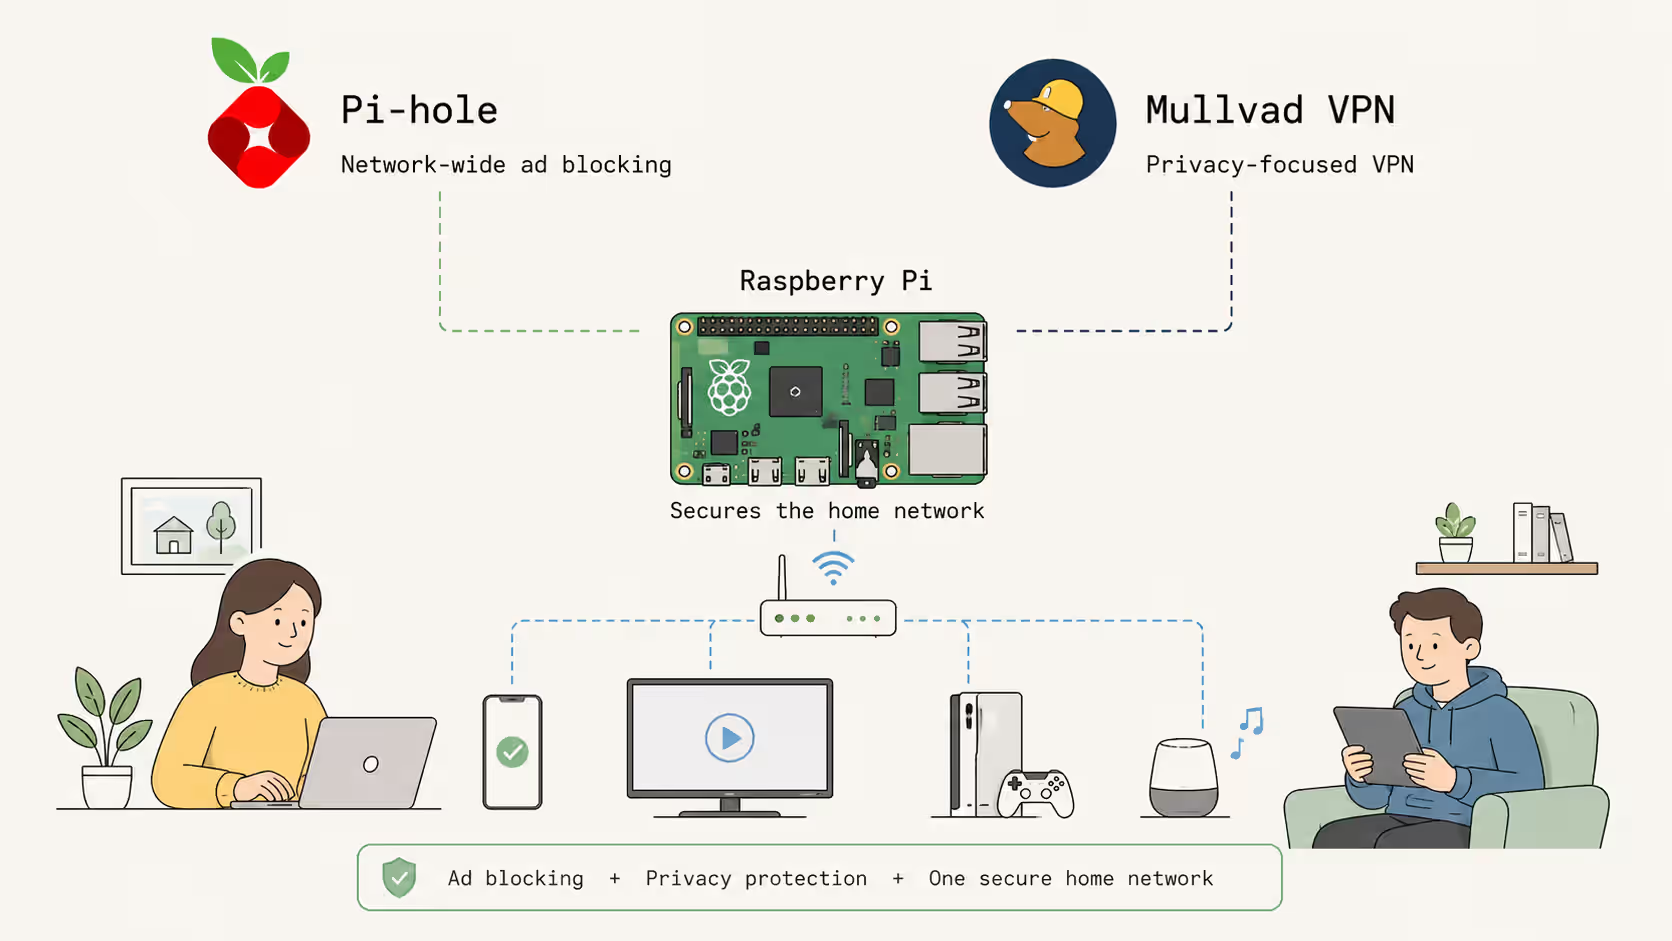
In this practical and easy-to-follow guide, we will configure a network-wide ad and tracker blocker, creating a sort of digital shield between you, your ISP, and third-party analytics companies.
In this setup, we will use Pi-hole (a very popular DNS filtering system) to block ads and some of the most popular trackers, and the Mullvad VPN (a very privacy-friendly VPN provider) to hide your web traffic from your ISP.
What We Need
First, let's start by listing all the things we need to make our home or office network a lot safer and more private.
Raspberry Pi
The most important element of our little project is the Raspberry Pi. The Raspberry Pi (usually called just the Pi) is a very well-known and popular tiny PC, often used by nerds like us to test fun projects easily at home, without the need for an expensive server or dedicated remote server. It has a powerful ARM-based CPU, along with plenty of RAM to handle our processes. Basically, it has everything we need to implement our network-wide shield without performance issues.

As the operating system for the Raspberry Pi, we'll be using its custom-built Linux distro, called Raspberry Pi OS. In particular, we will be using the Lite version of the OS, the one without a graphical user interface, called Raspberry Pi OS Lite.
When it comes to memory, I would suggest getting the 4 GB or 8 GB Raspberry Pi variant, even though the setup will take a lot less than that.
Last but not least, you should have a basic understanding of the terminal and SSH connections, as we will be using them as our main human-to-machine interface.
Mullvad
For this project, we're going to need a Mullvad account. Mullvad is a very popular, privacy-friendly VPN provider and is probably one of the most secure on the market right now. You don't even need an email address to use them! When you subscribe, they assign you a random numerical account number, and that's all you need to use the product. Not even a password!

Mullvad also has a strict no-logging policy, which means that they do not save the history of their users' traffic, DNS requests, connection timestamps, IP addresses, or bandwidth usage.
This is an amazing policy to have, and if your goal is to keep your Internet traffic away from your ISP and avoid creating another detailed record of your online activity, this is definitely a great option.
I've chosen Mullvad exactly for this reason, and because I truly admire their devotion to free speech and an open Internet, and I think they're the perfect provider for this kind of application!
1. Prepare the Raspberry Pi
In this guide, we will not cover how to set up and flash the operating system on the Raspberry Pi, and will jump straight to the network configuration. But don't worry, there are plenty of detailed and easy-to-follow guides online, so you're in good hands!
OK, now let's start the project by configuring the Pi's IP address.
2. Set a static IP
To use the Raspberry Pi as both the DNS server (for Pi-hole) and gateway (for Mullvad), we need to set a static IP. When you connect a new device to a network via Wi-Fi or an Ethernet cable, an IP address is automatically assigned to it by the DHCP server (in a home network, this job is usually done by the router).
This is what's called a dynamic IP address assignment. However, for this project, we need what's called a static IP address assignment. "But why?", you may ask. Why not keep the dynamic IP? Well, there's a very simple reason.
With a dynamic IP, we're not 100% sure that the IP will remain the same in the future. The DHCP server might decide to change our device's IP address, making it impossible for other devices on the network to know where to find the Raspberry Pi.
For this reason, we need to set a fixed IP address, so all other devices always know where to point when they need to ask questions to the Raspberry Pi.
To change the network settings of the Raspberry Pi, we're going to use the NetworkManager utility.
List all network interfaces
First, let's check all our network interfaces, so we can change only the right one. To do that, you can use the following command.
nmcli con show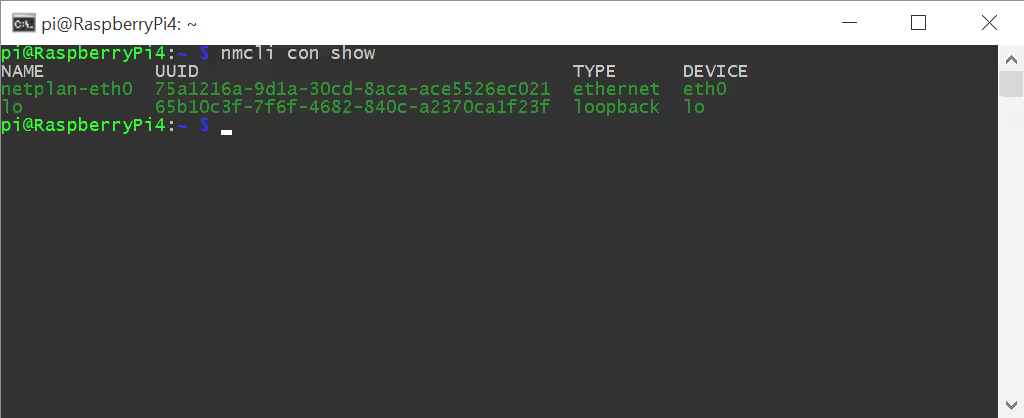
In my case, I have netplan-eth0 as the network name, and eth0 as the device name.
Configure it with the interactive text UI
When it comes to the NetworkManager utility, you have two options: using the simpler UI version or configuring it directly from the command line. There isn't a right or wrong approach, so choose whichever works best for you.
To open the UI version, use the following command.
sudo nmtuiOr configure it from the command line
However, for this specific case, I suggest using the command-line approach. It is simpler and faster, making it a good choice for a quick IP change.
To do that, use the command below, replacing the connection name, interface name, and IP addresses with the values used by your network.
sudo nmcli con mod netplan-eth0 ipv4.addresses "192.168.21.82/24" ipv4.gateway "192.168.21.1" ipv4.dns "192.168.21.1,1.1.1.1" ipv4.method manualApply the changes
To apply the network changes, execute the command below.
sudo nmcli device reapply eth0Verify the network interface info
After making the change, check that the address, gateway, and DNS settings are correct and match the values you set in the previous command.
You can see the updated settings with the following command.
nmcli device show eth0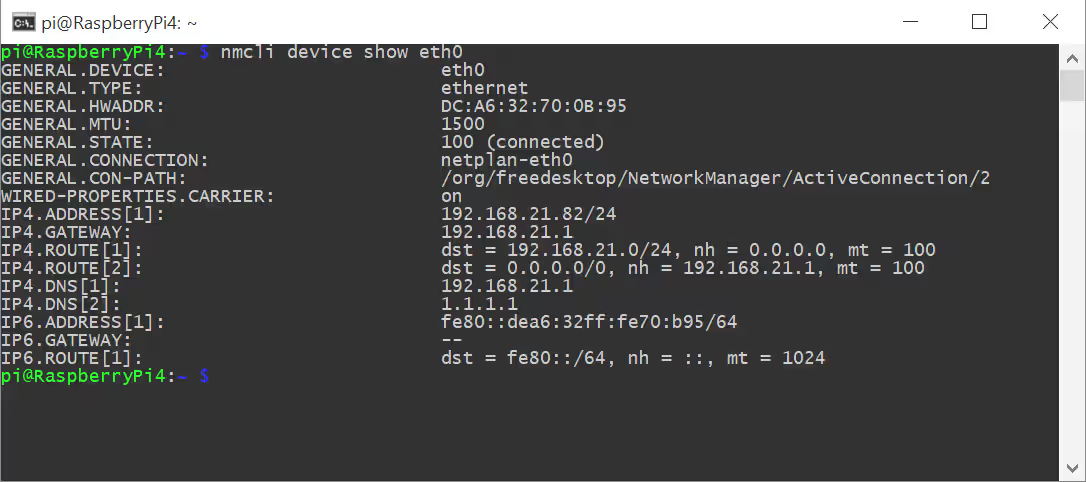
As you can see, the Raspberry Pi now has a static IP, which means there is no risk of losing track of it on the network because its address will remain the same.
If you are connected over SSH, keep in mind that the connection might drop and that you'll need to reconnect using the newly updated IP address.
3. Install Pi-hole
Update the system first
Before installing Pi-hole, let's make sure that the operating system and all installed packages are up to date, so we start with the latest available security fixes.
Execute the following commands to get the latest updates. After that, reboot the Raspberry Pi to be sure to use the new up-to-date software.
sudo apt update && sudo apt full-upgrade -ysudo reboot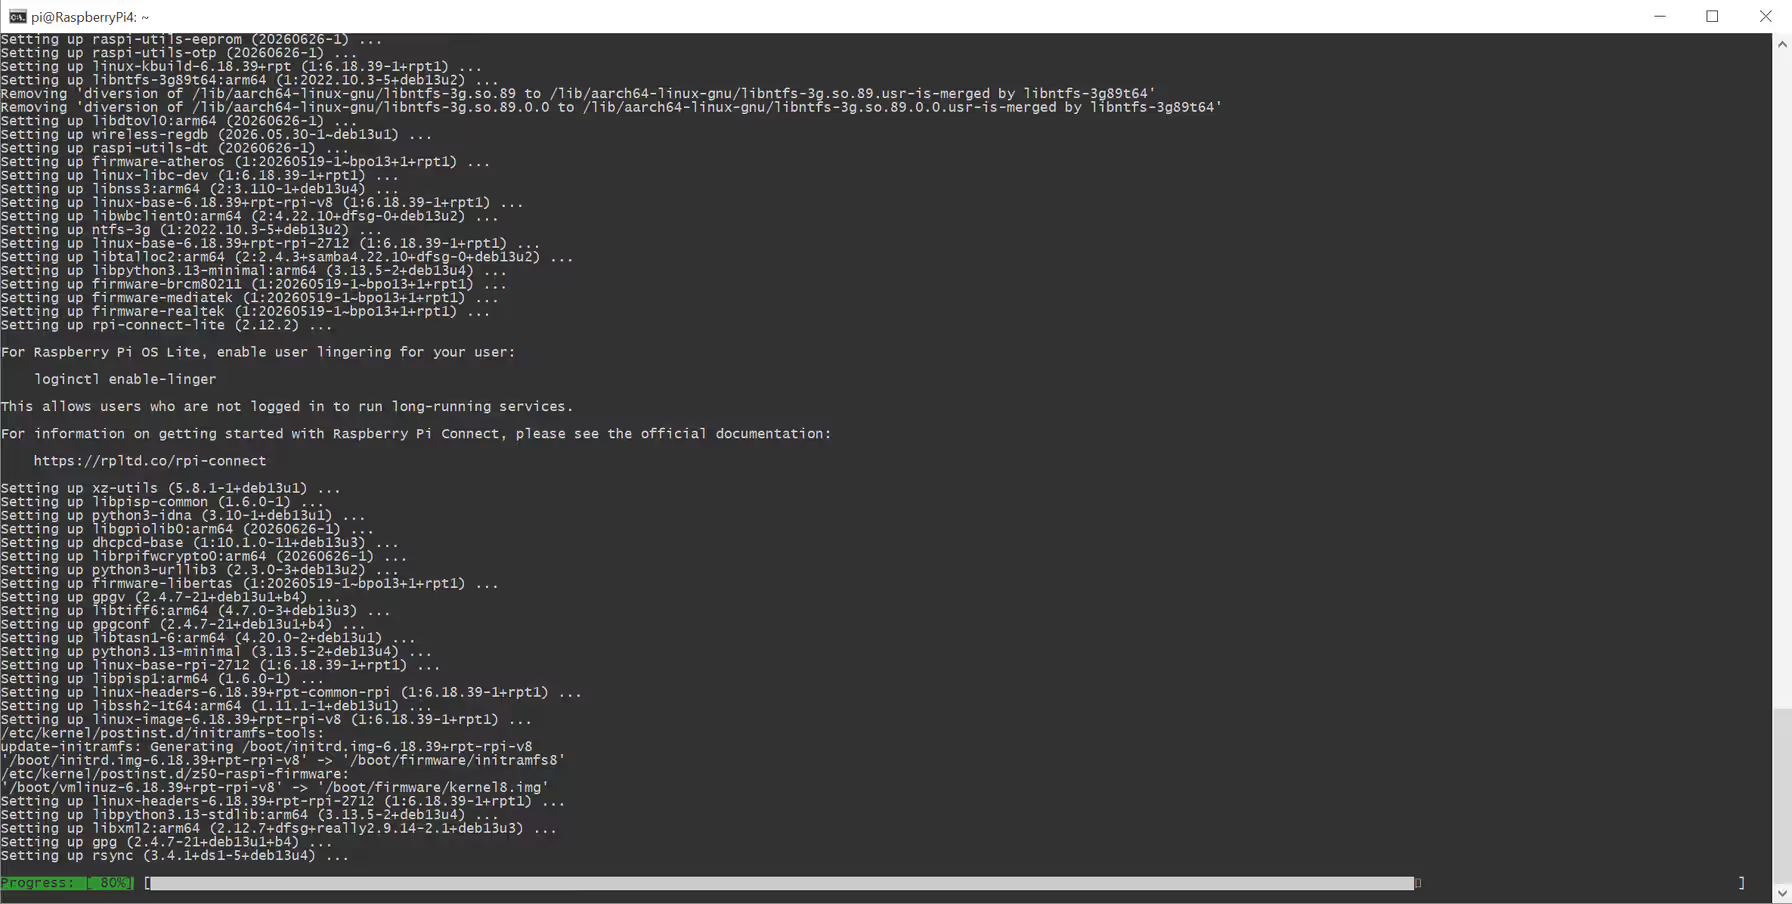
Install Pi-hole
Now we can finally install Pi-hole using its official one-step installer, making it extremely easy to install everything we need to run the program.
If you prefer to know exactly what will be executed on your Raspberry Pi and have a basic understanding of shell scripts, you can review the script before running it.
curl -sSL https://install.pi-hole.net | bashAfter executing the script, you should see the screen below.
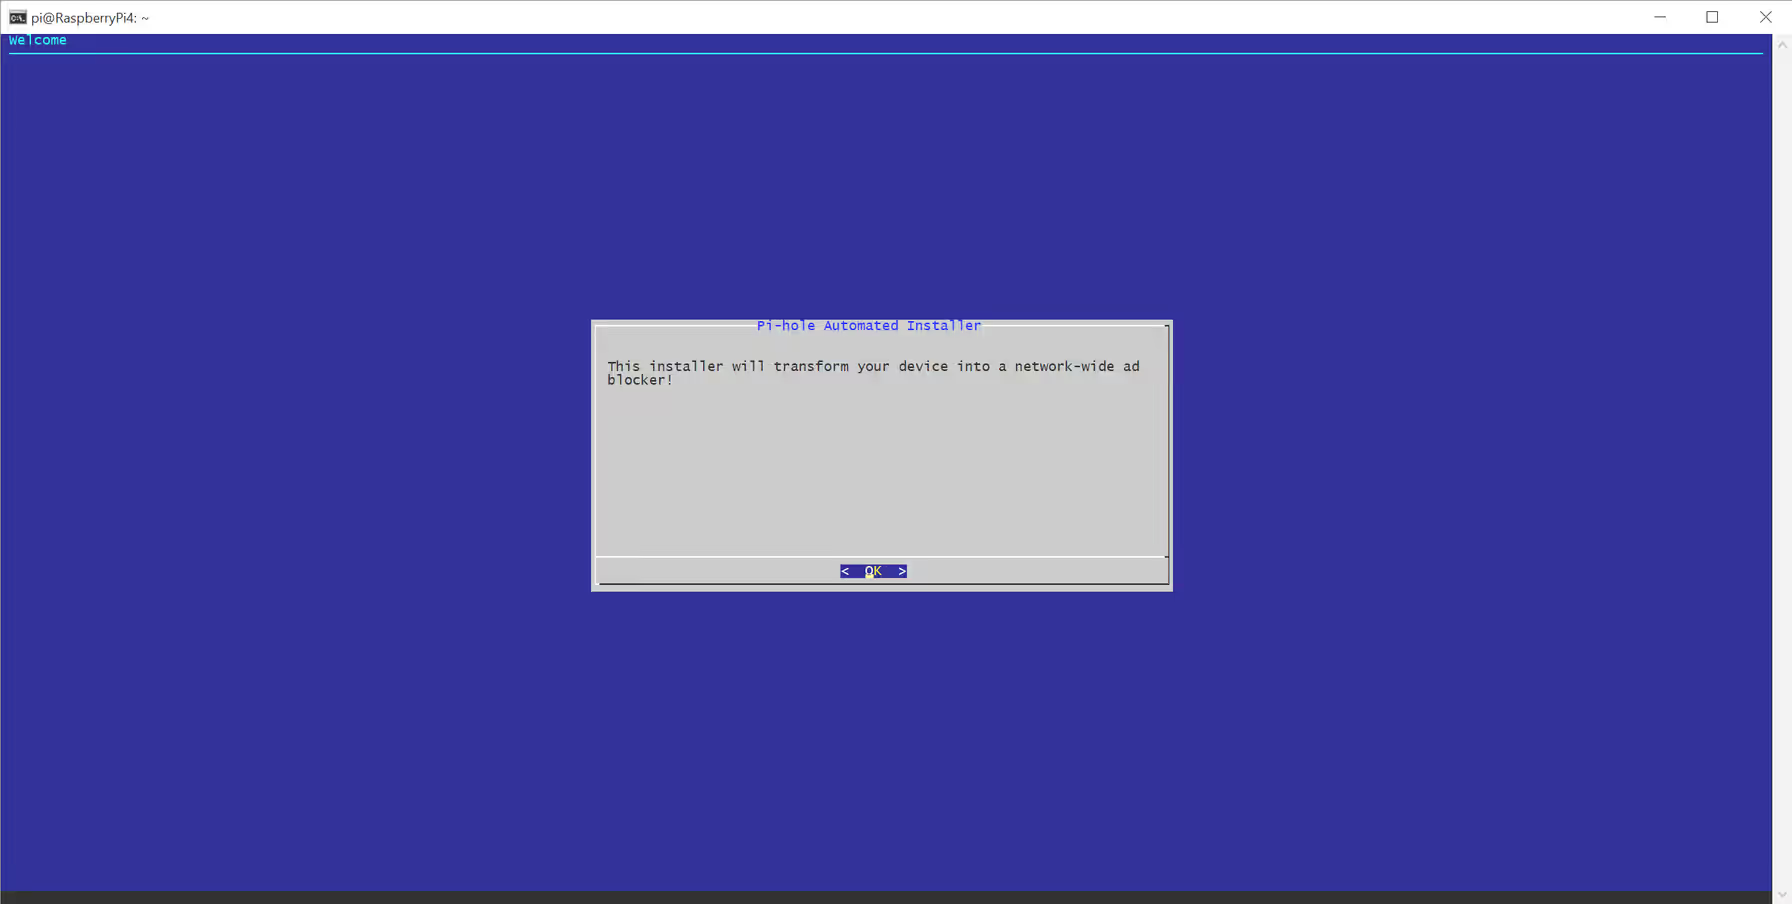
Pretty exciting, isn't it?
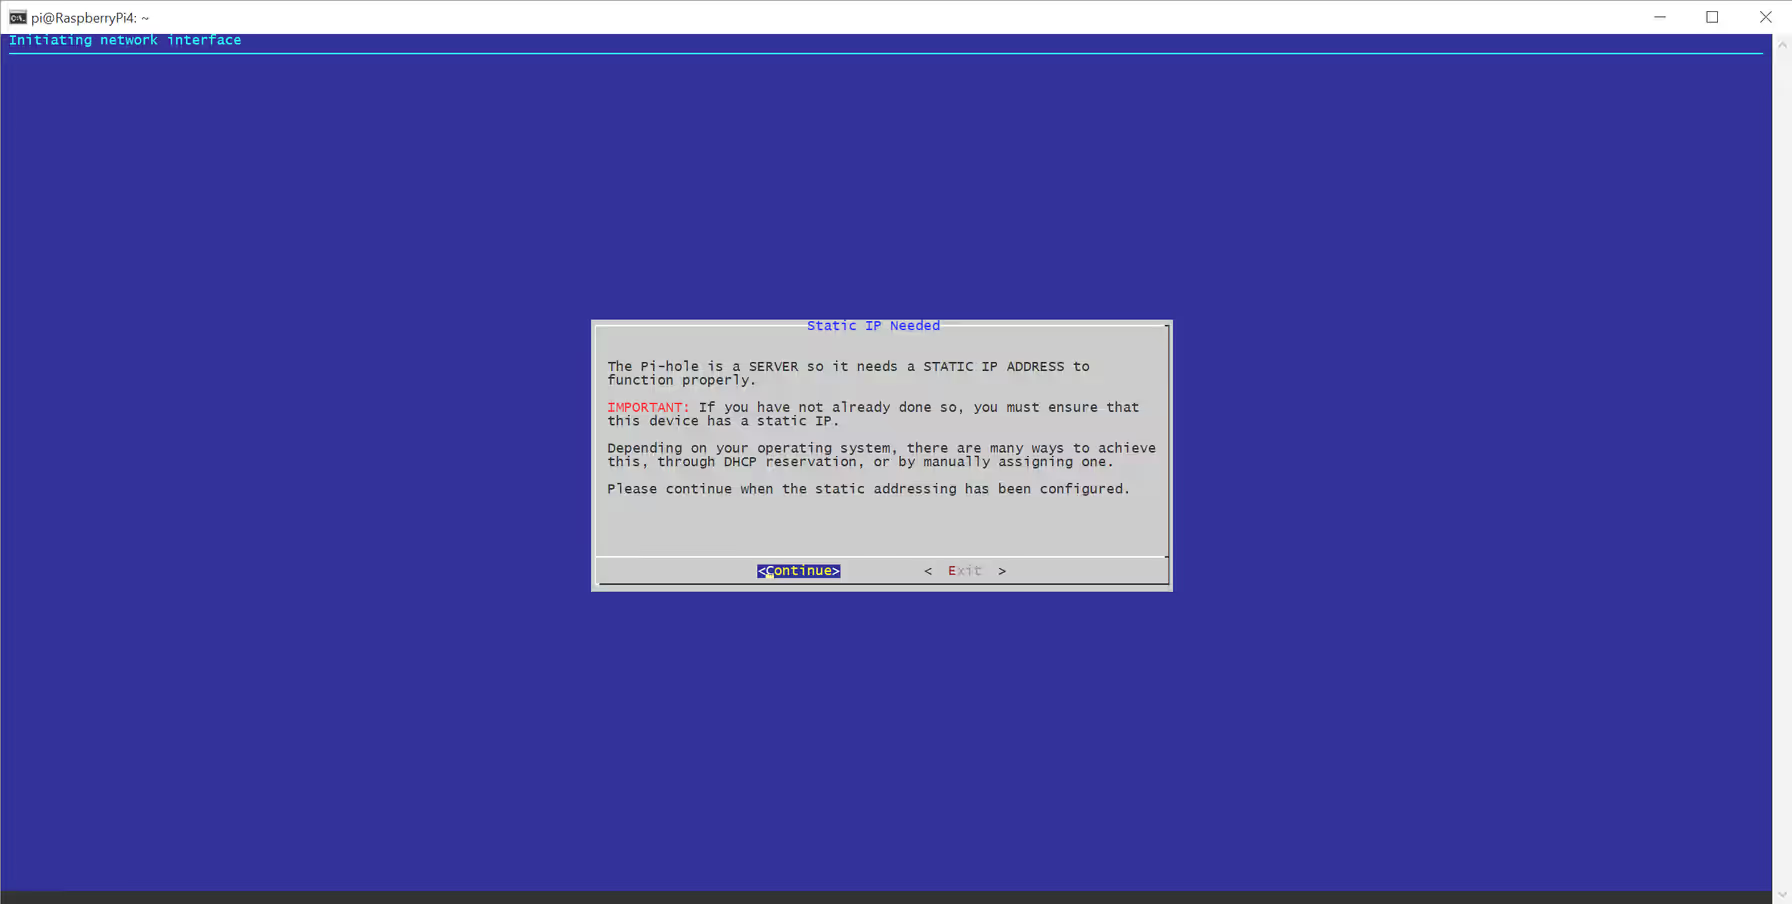
The installer will now guide you through a few interactive screens.
First, let's confirm that our Raspberry Pi already has a static IP address. Click Continue to move to the next step.
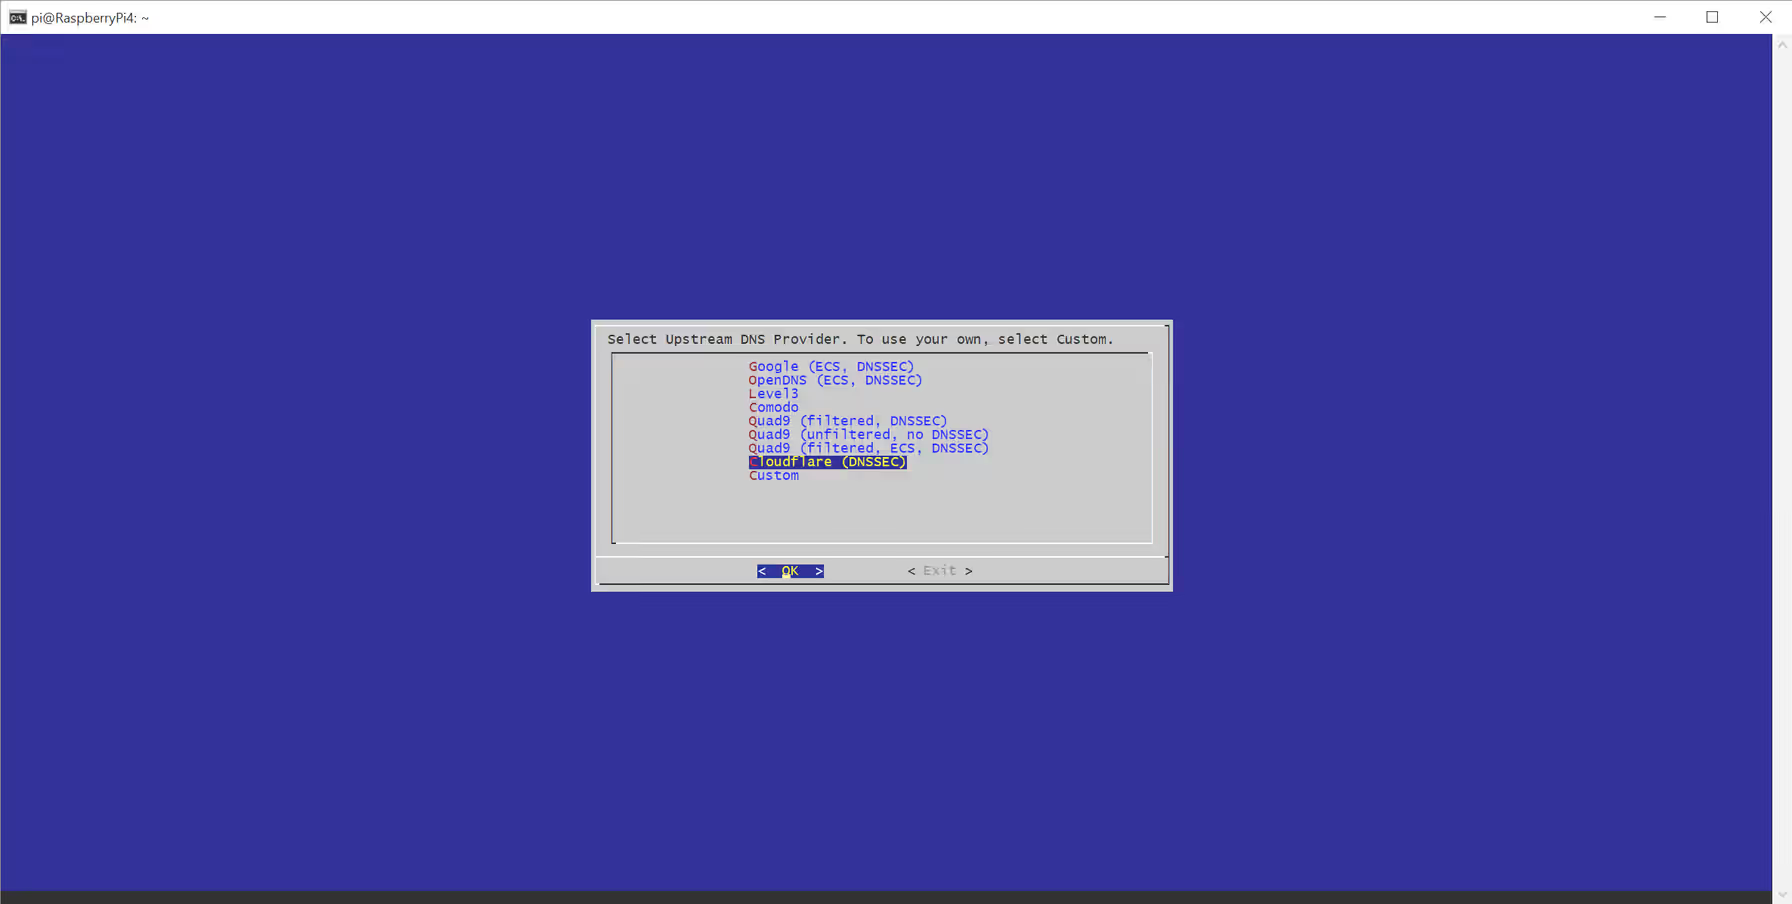
Now we need to choose an upstream DNS provider. We can select Cloudflare for now; we will change this later, once the Mullvad VPN tunnel is working.
In the next step, we're going to set the default blocklist, which is the list of domains that Pi-hole will block. Pi-hole uses the StevenBlack Unified Hosts blocklist by default, which is a great starting point for blocking known advertising and tracking domains.
We can just confirm here.
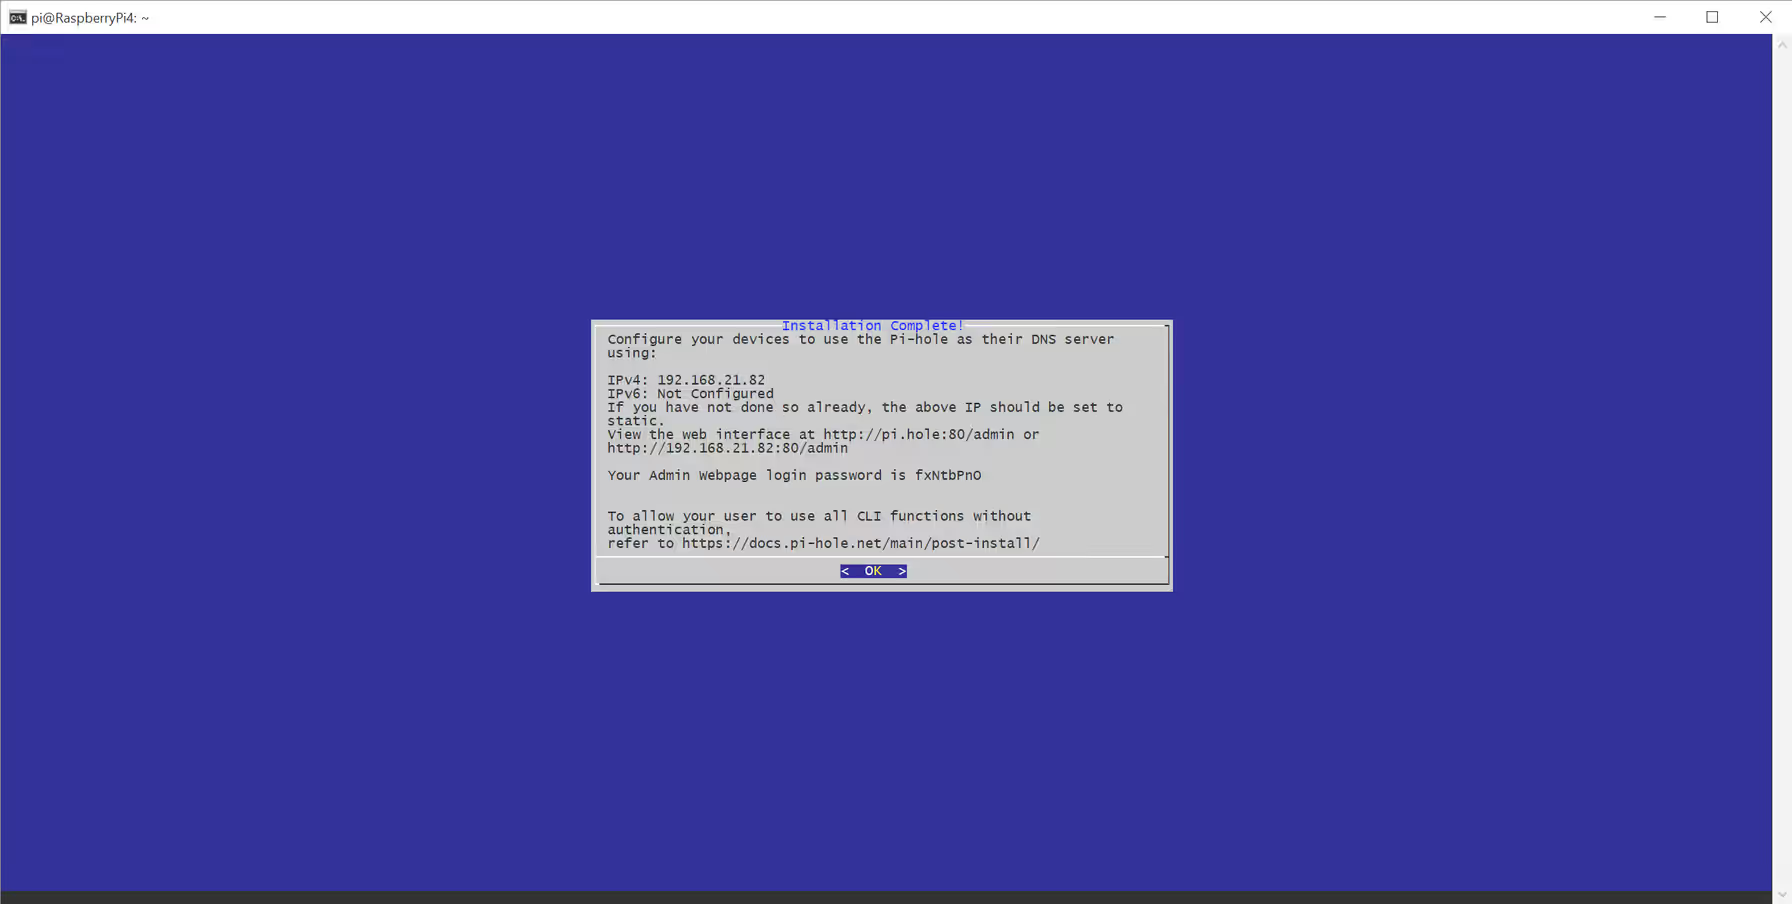
Great! The installation should now be complete! If you want, you can write down the Pi-hole admin dashboard link along with the password.
The Pi-hole address is usually something like http://<pi-ip>/admin, or, if you prefer the DNS version, something like http://pi.hole/admin.
If everything went well, opening the Pi-hole dashboard link should take us to the login page!

Set a new password
If you don't like the auto-generated password and prefer something easier to read and memorize, you can change it from the command line.
For this project, I recommend changing it immediately to a password you can manage securely. As always, do not reuse a password from another service!
sudo pihole setpasswordAfter changing the password, we can log in to the Pi-hole dashboard.
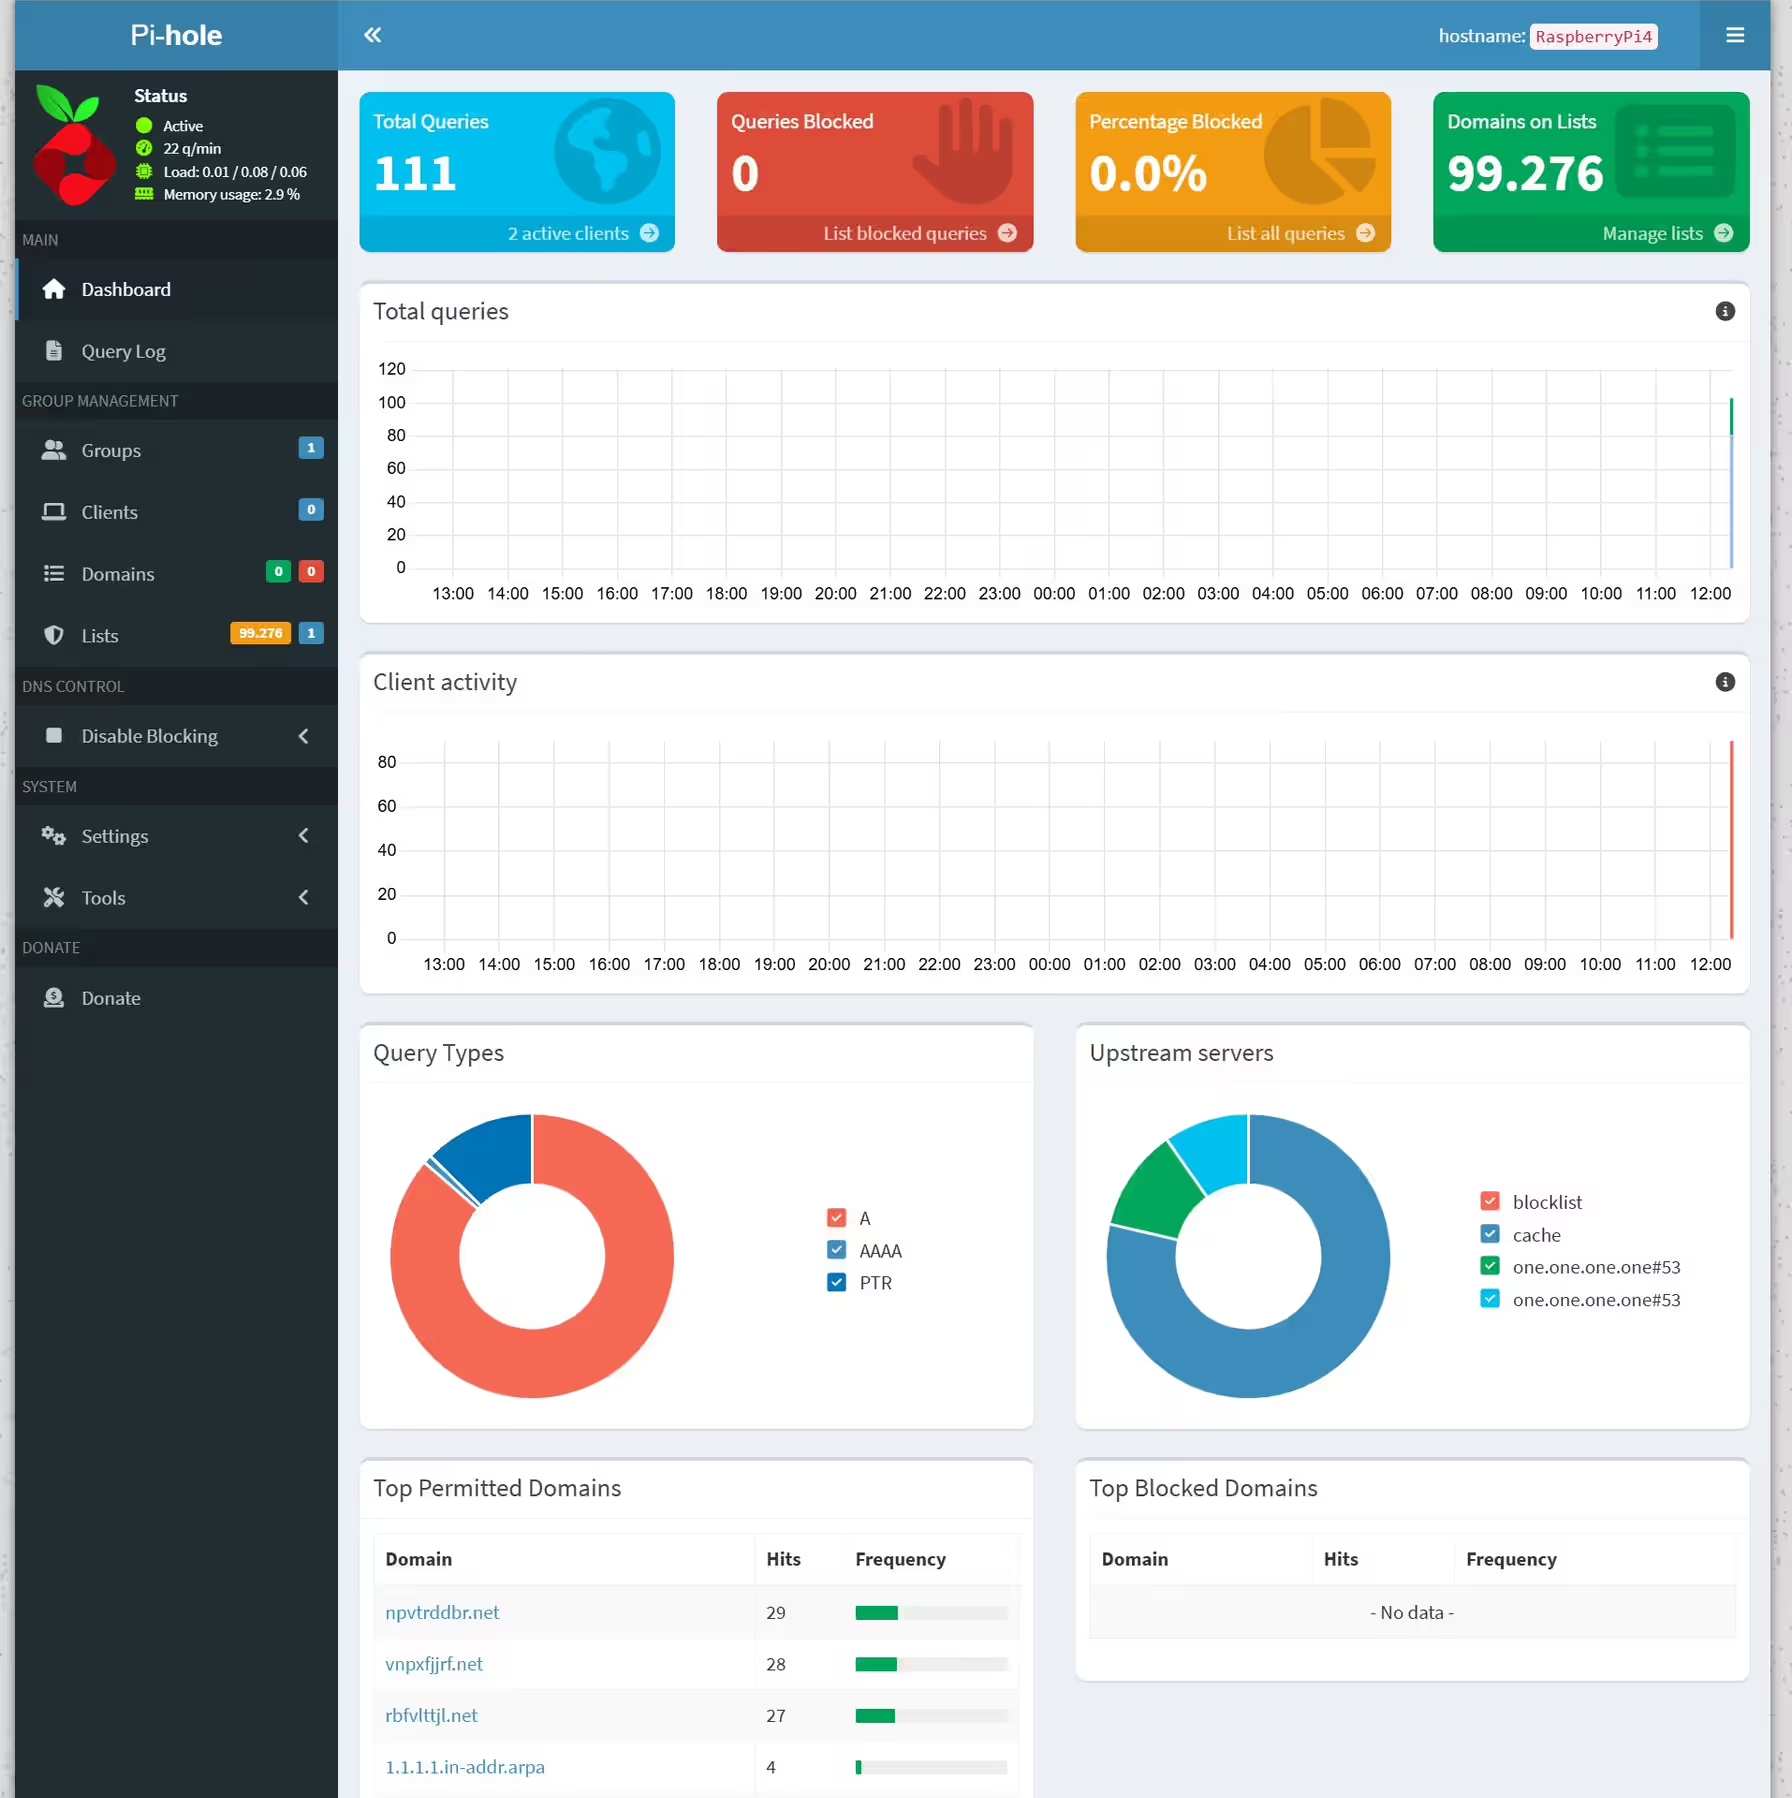
Fantastic! Now we have a working network-wide ad and tracker blocker!
If you want to learn more about Pi-hole and how it works, you can check the official documentation.
4. Configure DNS for your network
At this point, Pi-hole is installed on our Raspberry Pi, but it will only filter DNS requests that are actually sent to it. To apply the filtering across our entire network, we can change the router's settings. We need to update the router's DHCP configuration so that the Raspberry Pi's IP address is used as the primary DNS server for every device that connects to the network.
In my case, I have a router that does not let me change the DNS server sent through DHCP, so I have to set the DNS server manually on each device. Both options are valid, but configuring it at the network-wide router level is definitely the more reliable option when your router supports it.
After changing the DHCP settings, renew the lease or reconnect each client, and then verify that the Raspberry Pi is listed as its DNS server.
You can check whether Pi-hole is receiving traffic from its main dashboard.
You can also configure the Raspberry Pi itself to use Pi-hole as its DNS server by editing the /etc/dhcpcd.conf file or using the NetworkManager utility. Be careful when changing these values, because an incorrect DNS or network configuration can completely break its network connectivity!
5. Install WireGuard and Mullvad
Once Pi-hole is fully working on our network, we can install WireGuard and configure the Mullvad tunnel. "Wait, WireGuard? What's WireGuard?", you may ask.
WireGuard is a modern VPN protocol that creates a secure and encrypted tunnel between the Raspberry Pi and a VPN server. It is lightweight, fast, and relatively simple to configure, which makes it a great fit for a small device such as the Raspberry Pi.
Mullvad provides WireGuard configuration files for its VPN servers, but it does not directly install or manage the VPN connection on our Raspberry Pi. In a nutshell, WireGuard is the software that reads this configuration, establishes the encrypted connection to Mullvad, and routes the Raspberry Pi's Internet traffic through the VPN server. Without WireGuard, the Raspberry Pi would have no way to use the Mullvad tunnel.
The idea is to use the tunnel as the Raspberry Pi's outbound route while keeping Pi-hole responsible for filtering DNS requests.
Install WireGuard
Ok, now that we know what WireGuard is, let's install it on our Raspberry Pi:
sudo apt install wireguard wireguard-tools resolvconf -y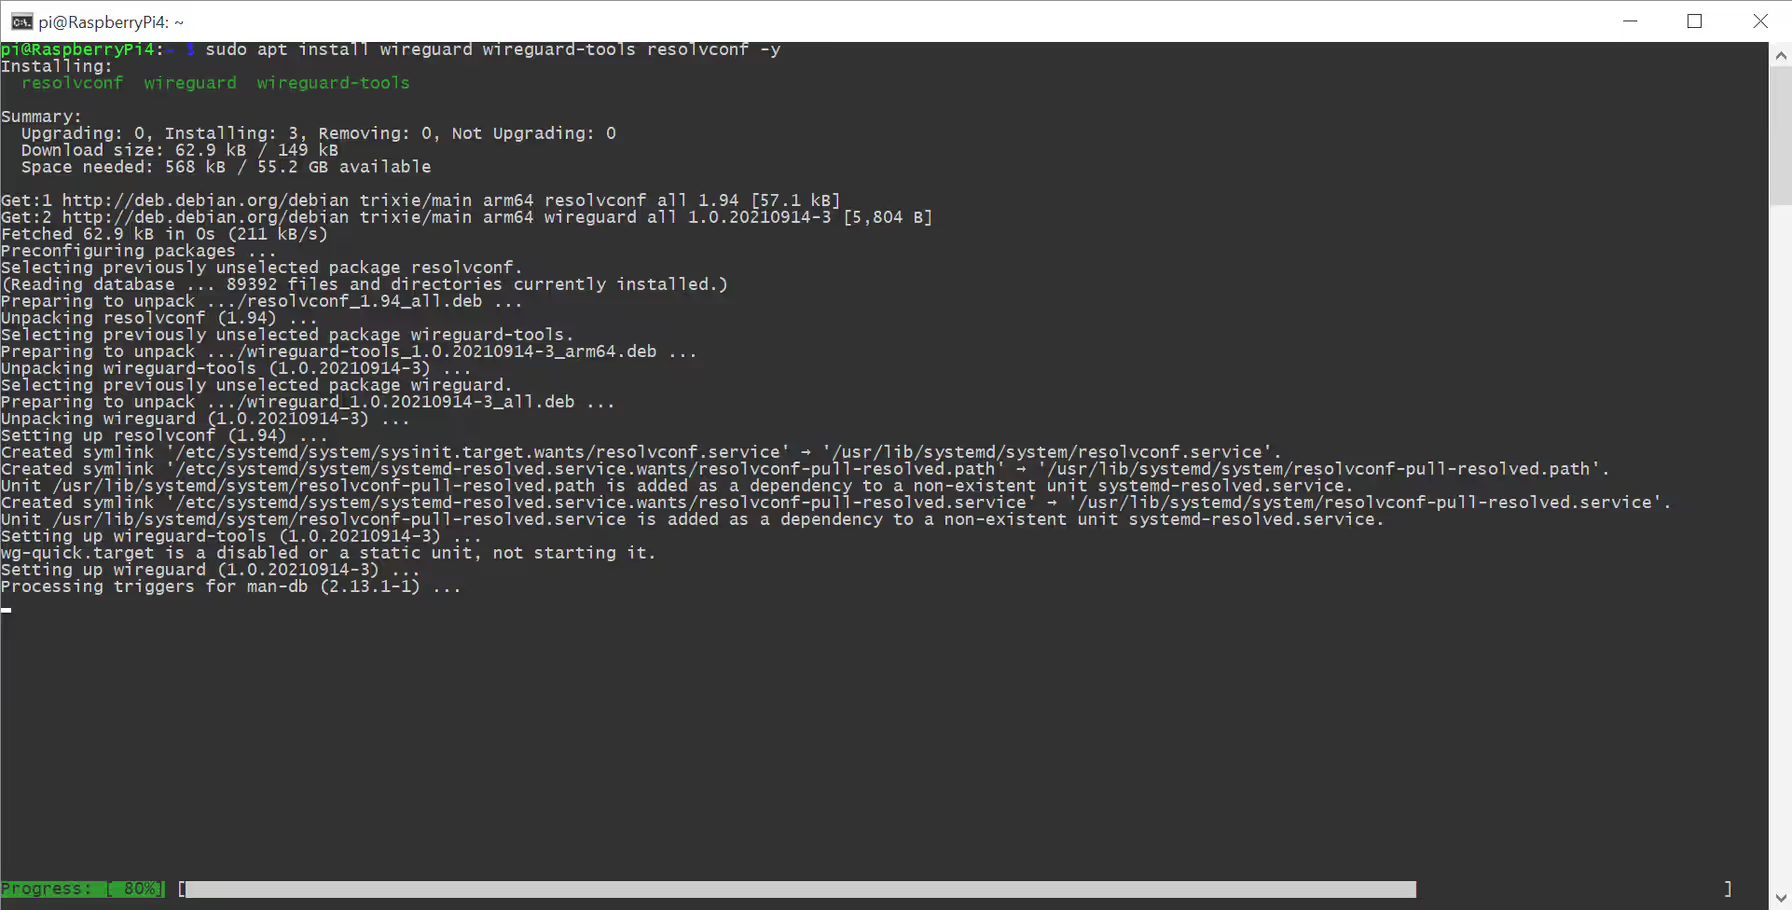
Ok, great! Now WireGuard is successfully installed on our little machine!
Configure WireGuard
The next step is to download a WireGuard configuration from the Mullvad account dashboard. Select WireGuard, choose Linux as the platform, select a server location, and save the resulting configuration file as mullvad.conf, and put it in the /etc/wireguard folder on the Raspberry Pi.
Because this configuration contains your private key, let's make it a bit more secure by making it readable only by the root user:
sudo chmod 600 /etc/wireguard/mullvad.confStart and verify the tunnel
Ok, now let's start the WireGuard interface manually first, so we can test the connection before configuring it to start automatically:
sudo wg-quick up mullvadNow check the tunnel status and confirm that the public IP address is being provided by Mullvad:
sudo wg showcurl https://am.i.mullvad.net/connectedYou should see a response similar to "You are connected to Mullvad", together with the name of the Mullvad server and its public IP address.
If the test succeeds, congratulations! Your Raspberry Pi is going through the Mullvad VPN!
Now let's enable the tunnel so that it starts automatically whenever the Raspberry Pi boots:
sudo systemctl enable wg-quick@mullvad
If you need to stop the tunnel while troubleshooting, use:
sudo wg-quick down mullvadRoute network traffic through Mullvad
Now that our VPN is running, the traffic originating on the Raspberry Pi is going through Mullvad, but we still need to manage the traffic of other devices. To route traffic from another device on the local network, such as a PC, the Pi must also forward and masquerade that traffic. The steps below assume that:
- The LAN interface is eth0.
- The Mullvad WireGuard interface is mullvad, because the configuration file is named mullvad.conf.
- The Raspberry Pi's LAN address is 192.168.21.82.
Before running the following commands, replace these example values with the ones from your own network. If you are not sure which interfaces are being used, you can find their names with:
ip link showFor example, if your WireGuard interface is named wg0, replace mullvad with wg0 in the commands below.
Enable IPv4 forwarding
Check whether forwarding is already enabled:
sudo sysctl net.ipv4.ip_forward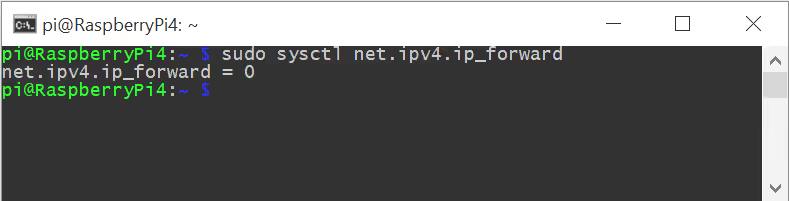
The value must be 1. If it is 0, as it was in my case, the Raspberry Pi can access the Internet itself, but it cannot forward traffic from a PC or another LAN device using the Pi as its gateway. Enable forwarding immediately with:
sudo sysctl -w net.ipv4.ip_forward=1To make the setting persistent across reboots, add it to a sysctl configuration file and reload the system settings:
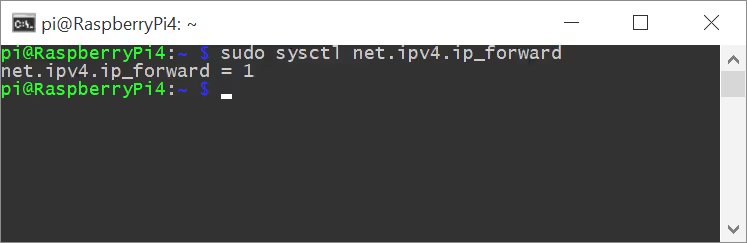
echo 'net.ipv4.ip_forward=1' | sudo tee /etc/sysctl.d/99-router.confsudo sysctl --systemThe result of the following command should now be 1, confirming that forwarding is enabled:
sudo sysctl net.ipv4.ip_forwardAs you can see in the screenshot, the setting is now enabled.
Allow forwarding and add NAT
Now we need to allow traffic to travel from the LAN to Mullvad, and allow established return traffic to come back from the tunnel.
To do that, use the following commands:
sudo iptables -A FORWARD -i eth0 -o mullvad -j ACCEPTsudo iptables -A FORWARD -i mullvad -o eth0 -m conntrack --ctstate ESTABLISHED,RELATED -j ACCEPTNext, masquerade the forwarded traffic so that the Mullvad tunnel knows how to return it to the Raspberry Pi:
sudo iptables -t nat -A POSTROUTING -o mullvad -j MASQUERADEThese firewall rules may not survive a reboot by default, so once you have tested that the route works, install the persistence helper and save them:
sudo apt install iptables-persistent -yWhen the installer asks whether you want to save the current IPv4 rules, confirm the choice:
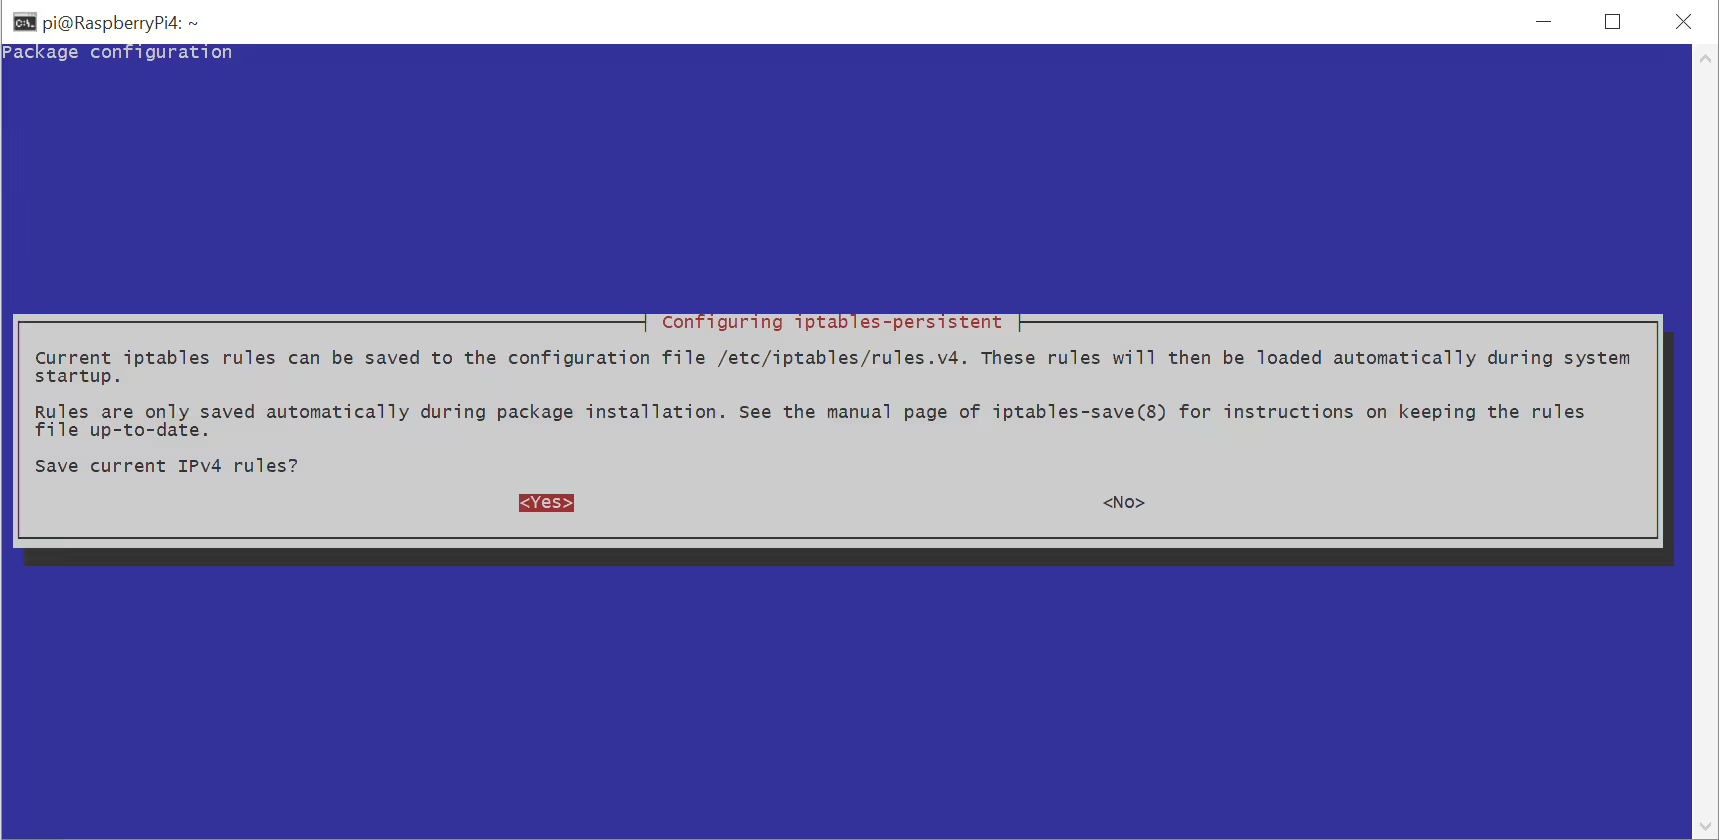
Do the same for the current IPv6 rules:
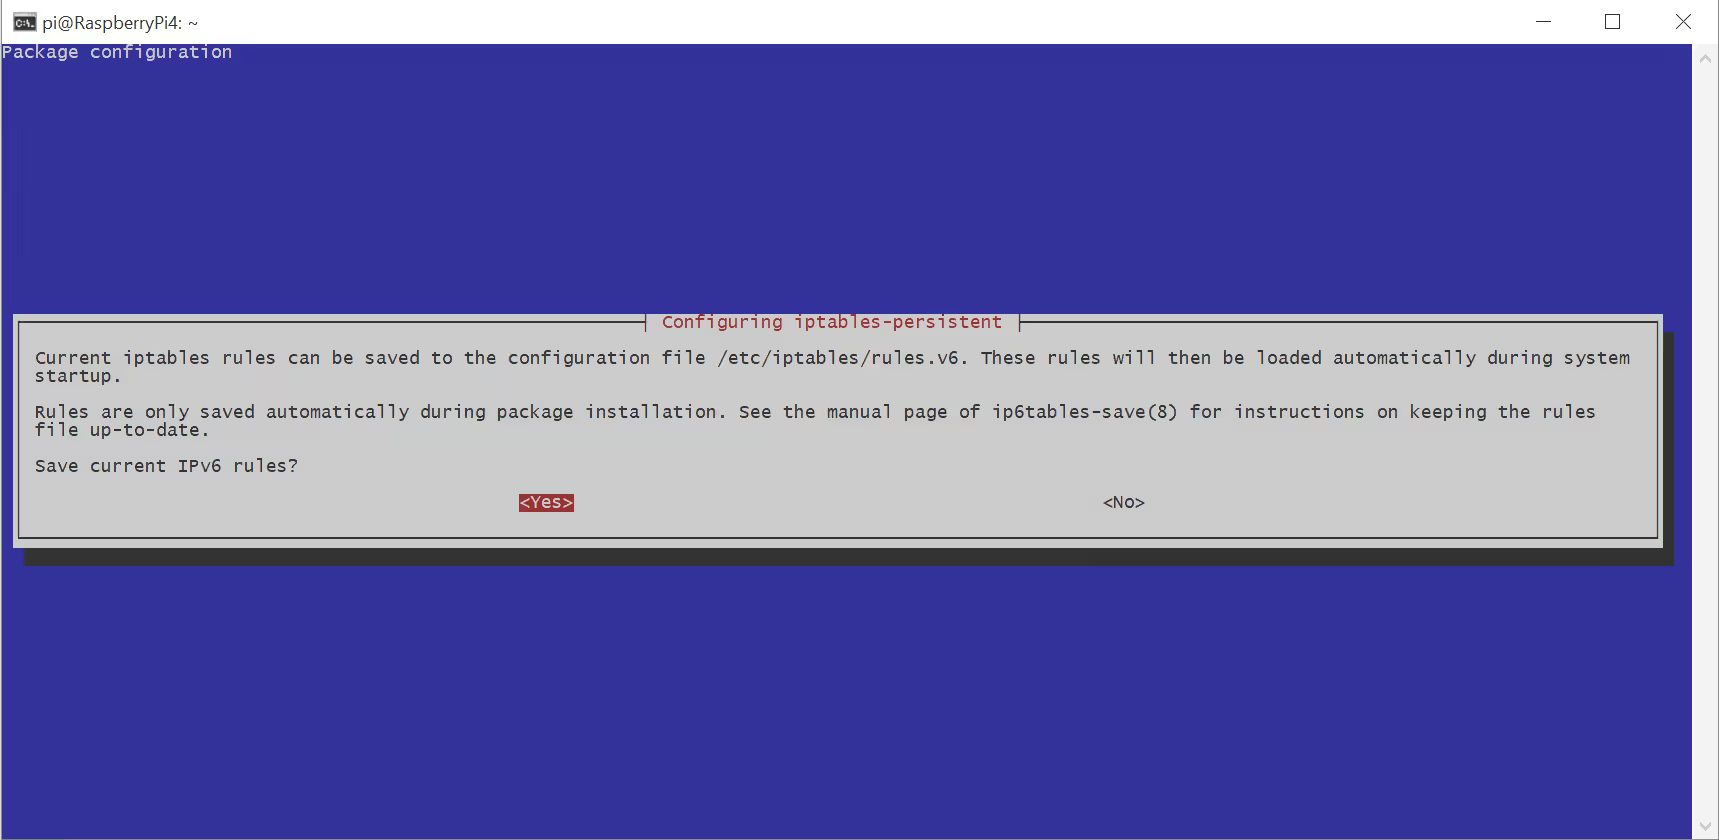
Perfect! Now let's save the changes:
sudo netfilter-persistent save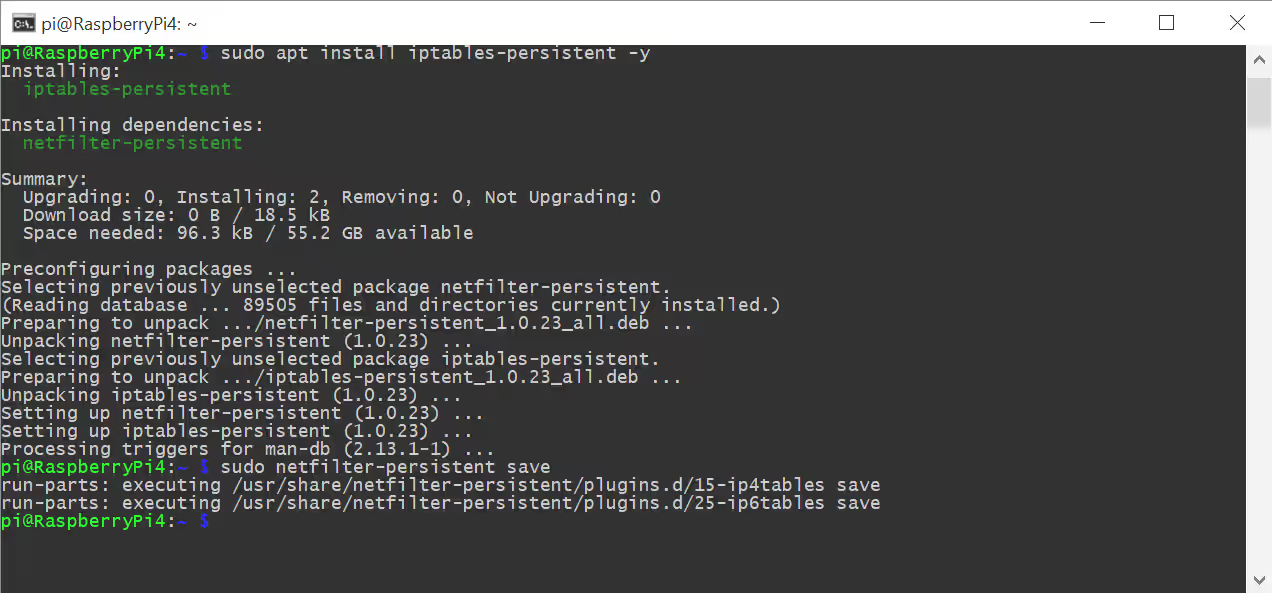
Configure the network devices
Finally, we can configure all the devices on the network to use the Pi as both the DNS server and the gateway.
Update the devices with the following values:
- An IP address in the same LAN as the Raspberry Pi.
- The Raspberry Pi's IP address as the default gateway.
- The Raspberry Pi's IP address as the DNS server.
Great! Our devices are now using the newly configured network shield!
Test the route in stages
Before celebrating our victory too early, let's run a few tests to make sure that the network and routing are working as they should.
To do that, we will ping a few devices and servers. If you're not too technical, pinging basically means using the ping command to check whether one device can "talk" to another over the network.
First, let's check whether the device can reach the Raspberry Pi, which acts as both its DNS server and gateway. Keep in mind that you need to replace the IP in the command below with the actual IP address of your Pi.
ping 192.168.21.82You should see multiple successful responses from the Raspberry Pi.
Okay, great. Now let's try something a bit more difficult: pinging an external server to see whether the routing works as planned. For this example, we will ping Cloudflare's DNS server at the well-known and iconic 1.1.1.1 address.
ping 1.1.1.1As before, you should see several successful responses from the Cloudflare DNS server.
Now, for the final test, let's try a DNS resolution:
nslookup example.comIf the tests do not go as planned, and you do not receive successful responses from all of them, here's a quick checklist you can follow:
- If the first test fails, check the PC's network settings and gateway.
- If the first test succeeds but 1.1.1.1 fails, check IPv4 forwarding, the NAT rule, and the Mullvad firewall rules.
- If the public IP works but DNS fails, check that Pi-hole is listening on the LAN and that the PC is using Pi-hole for DNS.
While making a request from the PC, we can monitor the WireGuard counters to see whether traffic is going through the Raspberry Pi:
sudo wg show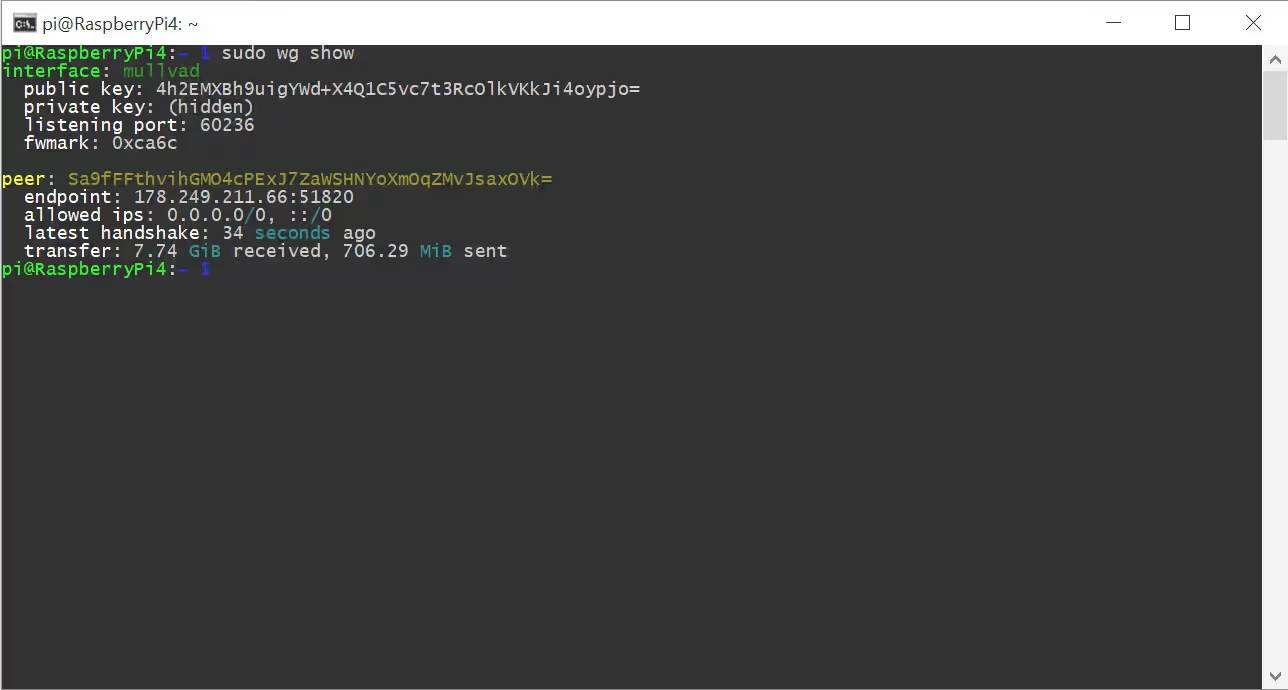
The transfer counters should increase as the PC's traffic passes through the tunnel. You can also verify the public exit address of the VPN directly from the PC with:
curl https://am.i.mullvad.net/connected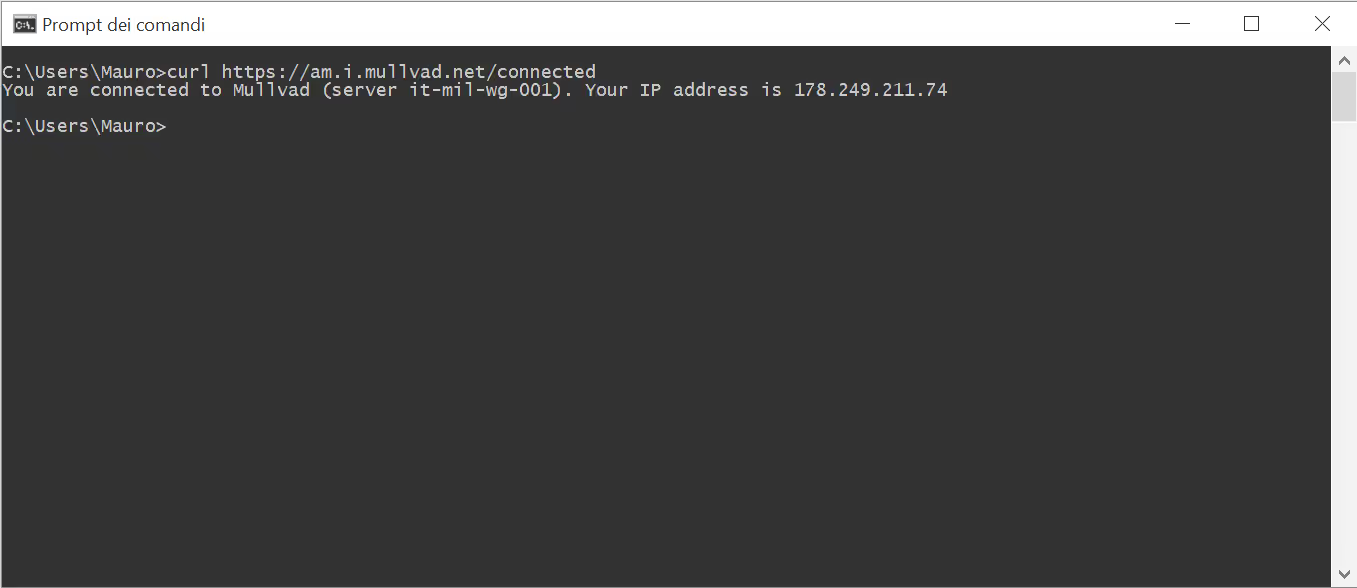
So, that's it! You now have a secure and private network! But before we end the guide, we can make one final, very important check to see if our network is properly protected and shielded.
6. Check if we're actually secure
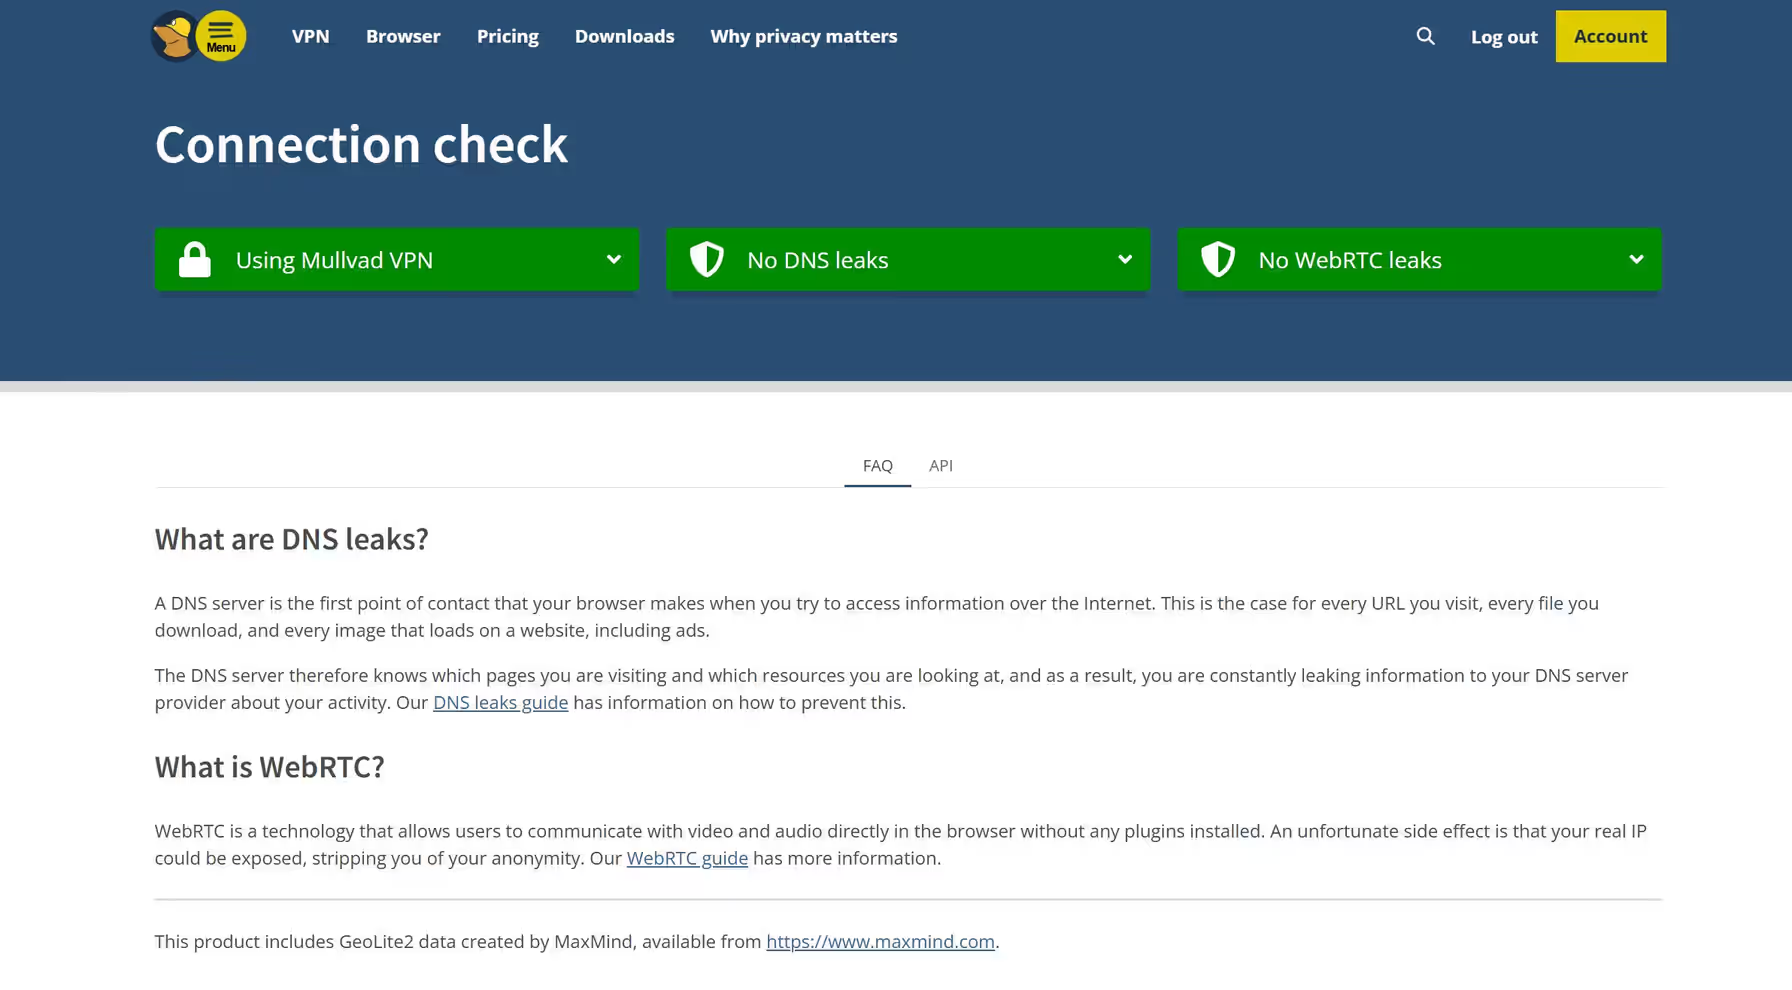
The final step is to check whether everything is working as expected and that our network is secure and shielded from outside eyes. Open the Mullvad connection check page and look at both the exit IP address and the DNS resolvers being reported.
What the result means
Mullvad has a very quick and easy way to see if your network is fully protected. If every section is green, you're OK! If some is red, well... Not so good.
- If the exit IP belongs to a Mullvad server, such as **it-mil-wg-001** in Milan, your traffic is going through Mullvad correctly.
- If the listed DNS resolvers are Cloudflare addresses such as **172.70.x.x**, **1.1.1.1**, or the corresponding IPv6 address, Pi-hole is currently forwarding DNS queries to Cloudflare.
In the vast majority of cases, you will see that the Using Mullvad VPN and No WebRTC leaks sections are green, and that the No DNS leaks section is red. The issue is that we are using Cloudflare as our DNS resolver, and Mullvad considers that a problem.
Cloudflare is a well-known privacy-friendly DNS resolver, but it is not operated by Mullvad. To be 100% sure that data is not leaked to third-party providers, Mullvad's connection check only reports No DNS leaks when the DNS resolvers belong to Mullvad itself, so it usually flags Cloudflare even when the VPN tunnel itself is working correctly.
Make the DNS check green
To make the Mullvad check completely green and report a successful No DNS leaks result, we need to change Pi-hole's upstream DNS server to one of Mullvad's DNS resolvers. You can use one of the following options, depending on whether you want filtering and whether the tunnel needs to remain active. In our case, I would opt for the first option, as we're already using Pi-hole to block malicious DNS requests.
- 1Mullvad's internal DNS: 10.64.0.1. This works only while the WireGuard tunnel is active.
- 2Mullvad public DNS without filtering: 194.242.2.2. This continues to work if the tunnel briefly drops.
- 3Mullvad public DNS with ad, tracker, and malware blocking: 194.242.2.4.
- 4Mullvad public DNS with ad blocking only: 194.242.2.3.
To change the upstream DNS resolver in Pi-hole, open the Pi-hole dashboard and follow these simple steps:
- 1Open the Pi-hole admin interface.
- 2Go to Settings, then DNS.
- 3Under Upstream DNS Servers, uncheck Cloudflare and any other selected providers.
- 4Select Custom and enter one of the Mullvad DNS addresses above. You can add both IPv4 and IPv6 resolvers if required by your network.
- 5Click Save at the bottom of the page.
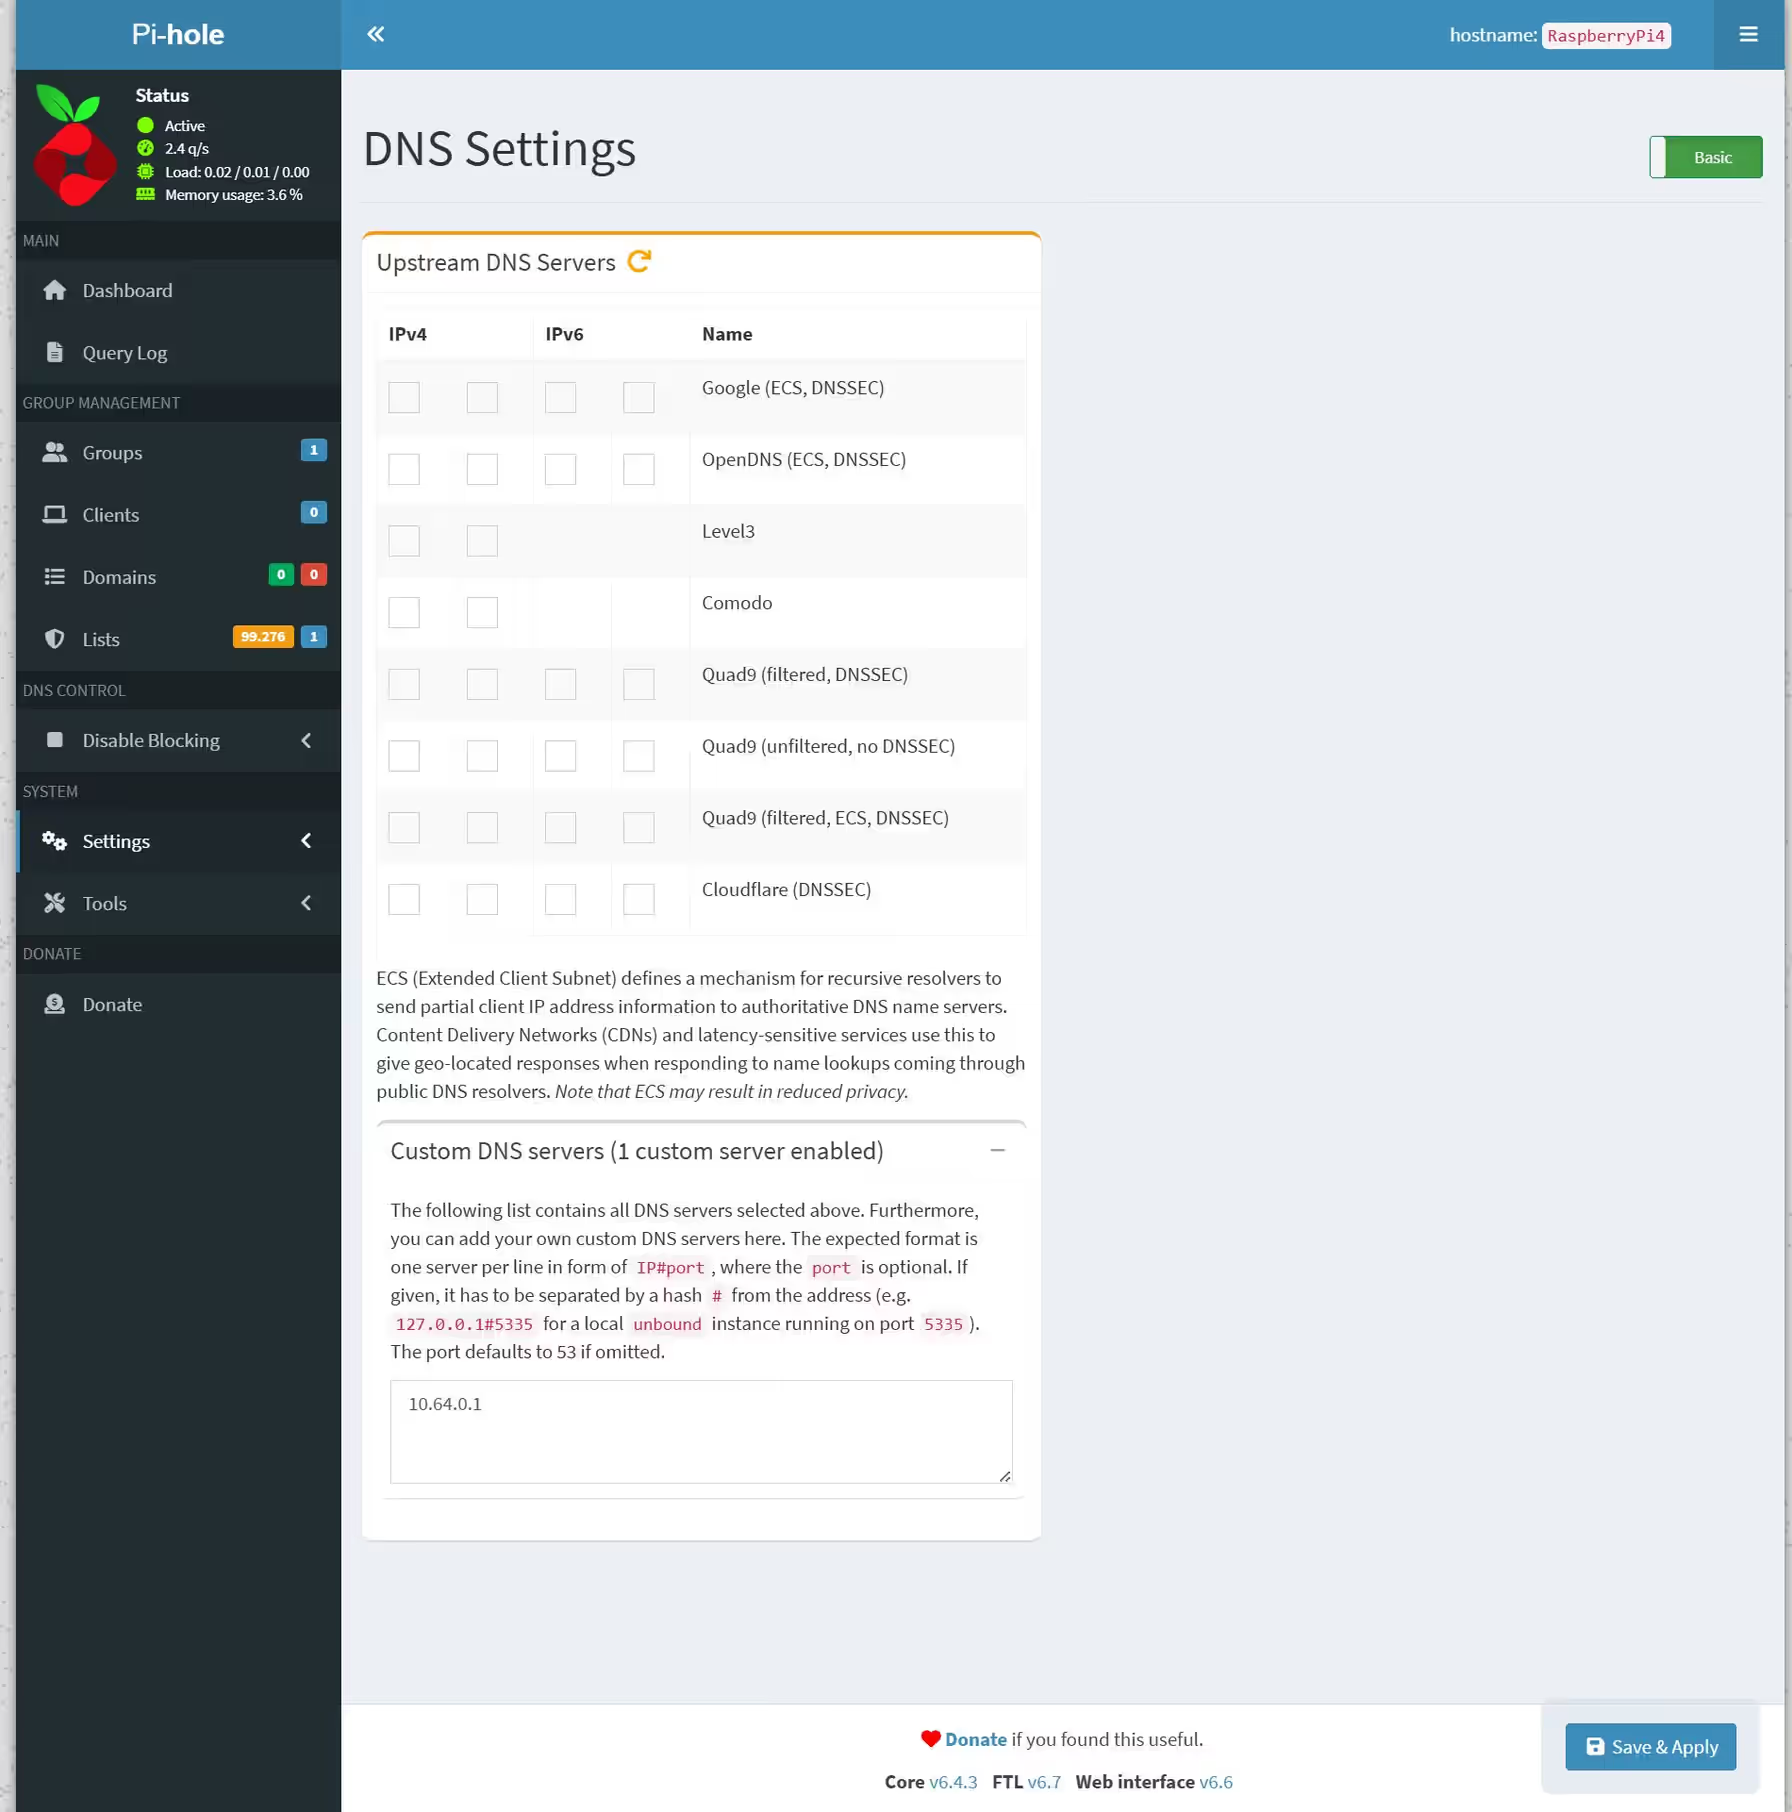
Wait a few seconds for the settings change to persist, then run the check again at mullvad.net/check. If the setup is fully correct, it should show a green No DNS leaks result and list only Mullvad DNS servers.
If the check still shows a DNS leak
If the Mullvad check still shows a DNS leak after changing Pi-hole's upstream DNS server to one managed by Mullvad, the most common reason is that the browser itself is using its own DNS-over-HTTPS (DoH) service. In that case, the browser ignores the system and Pi-hole DNS settings and connects directly to a provider such as Cloudflare or Google.
To fix this issue, disable the secure DNS feature in the browser you're using to surf the web.
Follow the steps below for the browser you're using:
Firefox
- 1Open Settings, then Privacy & Security.
- 2Scroll down to DNS over HTTPS.
- 3Select Off.
- 4Restart Firefox and run the Mullvad check again.
Chrome
- 1Open chrome://settings/security.
- 2Under Use secure DNS, turn the setting Off.
- 3Restart Chrome and run the Mullvad check again.
Edge
- 1Open edge://settings/privacy.
- 2Find Use secure DNS and turn the setting Off.
- 3Restart Edge and run the Mullvad check again.
If the result is still unchanged, try running the test in a private or incognito window, or use a different browser. This can help confirm whether the leak is caused by the browser rather than Pi-hole, WireGuard, or the Mullvad connection.
If the new test succeeds, congratulations! Your network is now fully shielded!
Conclusion
We're finally at the end of this journey! Your Raspberry Pi is now acting as a network-wide ad and tracker blocker while routing your Internet traffic through the Mullvad VPN!
Remember to keep Raspberry Pi OS, Pi-hole, WireGuard, and the Mullvad configuration up to date so your setup can continue to work reliably and receive the latest security patches.
If you also want to protect individual phones and tablets when you are away from home, take a look at our guide to setting up the Mullvad VPN mobile app! It is a useful companion to this network-wide Raspberry Pi setup!

So, we're done for today! I hope you liked this guide, and I hope to see you in another one soon!
Frequently asked questions
Find quick answers to the most common questions about this topic.
Pi-hole blocks ads and trackers at the DNS level, while Mullvad routes Internet traffic through an encrypted VPN tunnel. Together, they provide network-wide DNS filtering and VPN protection for devices that use the Raspberry Pi as their DNS server and gateway.
Yes. A Raspberry Pi can run Pi-hole as the network DNS server and WireGuard as the Mullvad VPN client. With IPv4 forwarding and NAT configured, it can also route traffic from other devices through the VPN tunnel.
The Raspberry Pi needs a stable IP address so other devices can always find it as their DNS server and gateway. A changing DHCP address could interrupt DNS filtering and prevent devices from reaching the VPN gateway.
Enable IPv4 forwarding on the Raspberry Pi, allow forwarding between the LAN and WireGuard interfaces, add a masquerade rule for the VPN interface, and configure each device to use the Pi as its gateway and DNS server.
Use Mullvad's internal DNS at 10.64.0.1 when the WireGuard tunnel is active. For public Mullvad DNS, use 194.242.2.2 without filtering, 194.242.2.4 with ad and tracker blocking, or 194.242.2.3 with ad blocking only.
Cloudflare is not operated by Mullvad, so Mullvad's check may report a DNS leak even when the VPN tunnel works correctly. To show No DNS leaks, configure Pi-hole to use a Mullvad DNS resolver instead of Cloudflare.
Disable DNS over HTTPS or secure DNS in the browser, then run the Mullvad connection check again. If the result does not change, test in a private window or use another browser to determine whether the browser is bypassing Pi-hole.

Author
Help me keep building!
Support my open-source work and help cover hosting, continuous security updates, and the tools that keep these projects moving. You can support me on Patreon or Ko-fi, with a recurring monthly contribution or a one-time donation. Every little bit helps, and I appreciate your support in keeping these projects alive and thriving!